Showing posts with label Do Re Mi Fa Sew. Show all posts

26 January 2011

January Sewing Project

b

One of my goals for the new year is to try my hand at sewing. I've sewn a few things here and there over the years but I've never been able to complete a project from scratch that I'm really proud to wear... they've always turned out a bit wonky. So, this year I'm taking on the task of completing on garment from scratch every month with the hopes of adding a few things to my wardrobe I'll want to wear on a regular basis.

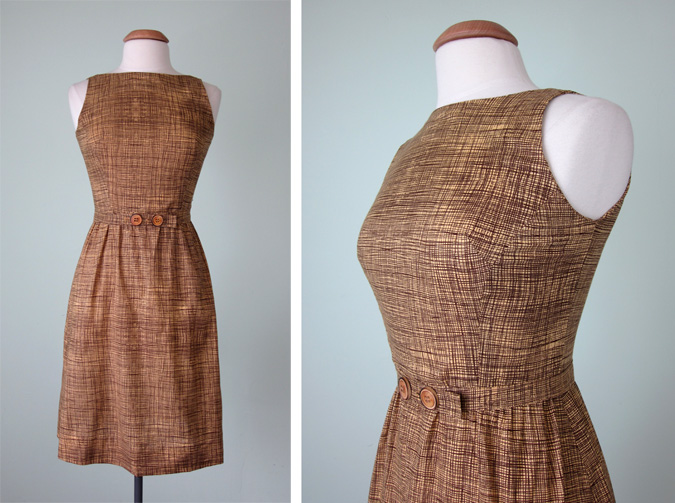
Yesterday I finally got around to tackling January's project. I picked a simple 60s dress pattern with a darted bodice and lightly gathered skirt and used an inexpensive printed cotton fabric from a local fabric store. Since it was my first project I didn't want to use vintage fabric or something expensive just in case it all went awry! I was going to take some "during" photos to show you how things went, but this being my first try, I wanted it to be pressure-free. Next time I'll take photos!

As you can see from the photos I actually completed the dress! Most of the sewing was done yesterday under the helpful eye of the best instructor I could have (thanks Mom!). Minimal use of the seam ripper was employed. ;) I couldn't find my zipper foot yesterday so I had to put the zipper in by myself this morning. Truth be told, if I'm going to be 100% happy with the dress I think I'll take the zipper out and try it again. There are a few pesky wonky stitches that I know will bug me if I don't fix them. The dress called for a tie belt, but I wanted to do a button tab belt instead to test my button hole skills. They're not exactly the prettiest button holes I've ever seen, but technically they're holes and a button went through them so... mission accomplished! Now if only it would stop snowing outside so I could actually wear it.

a

31 January 2009

Dress Rescue Part Deux

Untitled-1

I recently ran across this little wisp of a dress that was begging to be rescued. I love the eyelet lace, the pretty zig-zag seaming on the skirt and the little flutter sleeves. It's from the 30's and is definitely showing its age. It's a little dingy but nothing a good soaking and some sun bleaching won't take care of. The worst of it is the hole right at the neckline. I was hoping some creative stitching would take care of the problem but on closer inspection I realized that wouldn't do. A little brainstorming and I came up with the idea of attaching one of the vintage hand crocheted collars I found on my last trip to 'Bama. I pinned it in place to get an idea of the final product and I think I'm diggin' it. What do you think?

By the way, my last dress rescue project is still in the works (slow, I know). I'm so thankful for all of you giving your wonderful suggestions. After a bit of wavering back and forth I finally decided to go with the idea of sewing a pretty, wide ribbon around the hem to cover up the paint spots. A special thank you to whoever suggested that because I don't think I would have ever come up with that on my own. I'm on the lookout for the perfect ribbon but I haven't found one yet. Thus, the lack of progress.

03 January 2009

DIY To-Do

I, like many others I'm sure, can spend waaaay too much time fantasy shopping on the Anthropologie site. And every time one of the catalogs come in the mail, I get a bit weak in the knees. Not so much for the clothes in that case, but all of the wonderful locations they use. Hi, Anthropologie? Can I please have a job styling your photo shoots? Thanks!

Unfortunately most of my shopping lately has been just that - fantasy shopping. But just because I can't hit the "buy" button doesn't mean I can't take a little inspiration from my virtual shopping cart. Case in point - these two way-out-of-my-budget blouses. I've had these photos saved in my sewing to-do file for ages but haven't gotten around to putting them into action. Hopefully publishing the idea here will give me the little kick in the pants I need to finally get around to it. Both seem like they would be easy enough to accomplish. For the white blouse I need to find just the right black fabric to make a big, drapey bow. And the black one just requires a fitted black tank and a simple bow on the shoulder. The next time I'm at the thrift store I'm going to keep a special eye out for the materials and I'll let you know how it goes.

Untitled-1

17 December 2008

Dress Rescue Help

Untitled-1


One of my favorite vintage stores here in town is closing its doors at the end of the month. I'm sad to see it go because it's one of those shops that I can go into and spend hours digging through piles of sewing notions, boxes of old photographs and racks of vintage clothes. There's even a closet in the back that's stacked to the ceiling with vintage hats boxes. In other words, it's a little bit of heaven. Every time I've gone in to snoop around I've eyed this 40's brown velvet Jonathan Logan dress but it was priced a bit more than I wanted to pay. Since the shop is closing and everything is on discount, it was the perfect time to pick it up. When I went to try it on, I discovered to my dismay that the side zipper was stubbornly stuck and some of the teeth were missing. There's also a splotch of white paint on the front of the dress near the bottom hem. Well, despite its flaws I decided to take it home anyway. I figured it was worth trying to rescue.

First I took out the side zipper which was easy enough. I've already begun replacing it with one I had lying around. I was able to try it on and it's a perfect fit which was a relief since I couldnt try it before bringing it home. Now, here's where I need help. The white paint spot on the front of the dress is about 6 inches from the hem. I've tried to remove it but it just takes the nap of the velvet right off with it leaving a bare spot. So... I'm left with two options: leave it as is and just deal with the paint spot or cut off about 6 inches from the bottom and rehem the dress. Right now the skirt portion is about 28 inches long and falls completely below my knee. If I rehemmed it, it would be about 22 inches long and fall right above my knee. I would also use the extra fabric from the hem to make a belt since the original one is missing.

On one hand, it would be nice to get rid of that paint spot but on the other hand it always seem such sacrilege to cut into a vintage dress. What should I do? You can vote in the upper right corner. Thanks for your help!

10 December 2008

A Little DIY

3095761936_79b0d86b2f_o[1]
I almost feel bad calling this a DIY project since all it requires is a needle and thread. It's about as simple as it gets. The collar was taken from a vintage coat and the satin cord was the belt for a vintage dress. All I had to do was cut the belt in half then stitch the raw ends to the inside of the collar, right at the edge. One tip... for jobs like this I prefer to use a millinery needle. It makes it much easier to sew through the thick fabric. Once the satin cord is secure you can wear the collar over any coat or sweater. VoilĂ !

02 October 2008

DIY Belt

Untitled-1

A while back I mentioned that I wanted to try to recreate the belt on this girl's outfit from HelLooks. Whenever I go shopping at thrift stores or flea markets I keep an eye out for dresses or shirts that have lots of fabric that I can use to cut up for projects. It's a great way to get a lot of fabric for not much money. At any given time I've got a sack full of oversized dresses that I bought simply because I liked the fabric. Ever since I saw that little striped belt on HelLooks I've been looking for the perfect fabric to use in my recreation. Last week I finally found a dress in the right color, with the right size stripe in a fabric that I liked. I went to work and made my own version of the belt. As is usual with most DIY projects, I'm not 100% happy with my first attempt but I thought I'd show it to you anyway. I learned from my mistakes and I plan on making it again. I'm really terrible at how-to's but this was a pretty easy project if you want to try it yourself. All it takes is a couple of long strips of fabric and some iron-on interfacing. If anyone is interested I'll try to make up some more detailed instructions when I go for my second attempt.

09 September 2008

Sewing Schmewing

I’ve been bitten once again by the sewing bug as happens from time to time. I’ve taken a few sewing classes and possess some basic sewing skills. I can sew a straight seam, install a zipper and have even set a sleeve. The thing that I lack the most is the patience to see the project through from beginning to end. There’s a particular dress pattern that I was itching to tackle all summer but every time I took the pattern pieces out of the package I was instantly panic stricken and stuffed them right back into their envelope. I’ve decided that to get back into the sewing groove I should start easy. Instead of trying to sew a garment from scratch I’ve been making a list of pieces to be on the lookout for at thrift stores that I can alter and experiment with without worrying about ruining an entire bolt of fabric. A few of my ideas are:

  • Finding high waisted 70’s skirts and shortening them into swingy mini-skater skirts.
  • Using the leftover fabric from the hem of the skirt to make some sort of suspenders (or braces depending on where you’re from!) to button onto the waist of the skirt.
  • Finding worn-in flannel shirts and taking in the side seams and shortening the sleeves to make skinny button downs.
  • Finding high waisted pants to cut off into shorts. Something like these.
In the mean time, enjoy this collection of photos from Iowa State University Library Special Collections' photostream of young women learning the ins and outs of garment construction, from studying textiles to draping to weaving their own fabric all the while prim and proper in their sweater sets and circle skirts.
collage

19 August 2008

Put a Feather in Your Hair

collage

A few weeks ago as I was digging through baskets of antique sewing supplies at a flea market, I came across a big bag of vintage feathers. I wasn't quite sure what I wanted to do with them at the time so I put them away and nearly forgot about them. As my thoughts turned to planning my autumn wardrobe, I remembered that bag of feathers and pulled them out. It seems that over the summer I became quite addicted to wearing a flower in my hair. Rarely did I leave the house with one and it even came to be that I felt quite unfinished without one. I think that the feathers will become my must have accessory for autumn.

So far I've fashioned one headband and two haircombs using the feathers and some of the vintage buttons I collected in Baltimore. I'm saving some in hopes of finding a vintage hat, maybe a nice velvet one, to decorate.

2778392321_3c8cec7f23_o

12 July 2008

Lazy Saturday Afternoon


I've spent the afternoon in my pj's working on some sewing projects and going cross-eyed looking through Flickr groups like this one. I finally, finally altered a vintage bathing suit that I bought last summer. It's red, white and blue, from the 50's and perfectly all-American nostalgic. I haven't decided if the ol' world wide web gets to see me in a bathing suit just yet so no photos for you. Yikes! Tomorrow we're off on a road trip adventure to Maryland. I'm sure to return with tons of photos. Those you'll get to see!

05 April 2008

Sewing Project


On a recent trip to the thrift store I happened upon this dress. While the silhouette looks like something a first grade teacher would wear, I liked the tribal print, the deep armholes, the patch pockets and the buttons up the front. There was definitely some hidden potential here.

I ended up raising the dropped waist, taking up the shoulders a bit, taking it in down the sides and cutting about seven inches off the bottom. That sounds like a lot, but it really only took about an hour. I'm happy with the final result and I'm sure I'll be wearing it this week.

26 March 2008

Sewing Project #1


Thrift stores in these parts are plagued with these long, flowy hippie skirts. Since I'm not partial to Birkenstocks and patchouli I usually just pass them by. The last time I was out thrifting I broke down and bought a couple because I liked the ethnic print fabric. They've been sitting on my sewing table for weeks just collecting dust because I wasn't sure what to do with them. Well, yesterday I got on a sewing binge (I had to stop because I ran out of thread) and this long skirt was turned into two mini skirts. When it comes to sewing projects it doesn't get much more basic than this. Cut and hem. That's about it. Maybe I'll keep one for myself and put the other one up in the store.

09 January 2008

Ugly Dress Makeover

A couple of weeks ago I decided to brave the Jet Rag dollar parking lot sale once again. I had sworn it off after my last horrible experience there, but this particular Sunday afternoon had turned my brain to mush and I headed out armed with a can-do attitude and an open mind. What I found was a mountain of polyester 70's and 80's dresses with very little promise. After digging through mound after mound, I finally came across one with a subtle cream and black pattern that looked half way decent if I squinted my eyes. Finally! Something that showed some signs of life! I took the dress and my dollar to the counter and left for home feeling excited about the possibility of making over the dress into something cute and wearable.

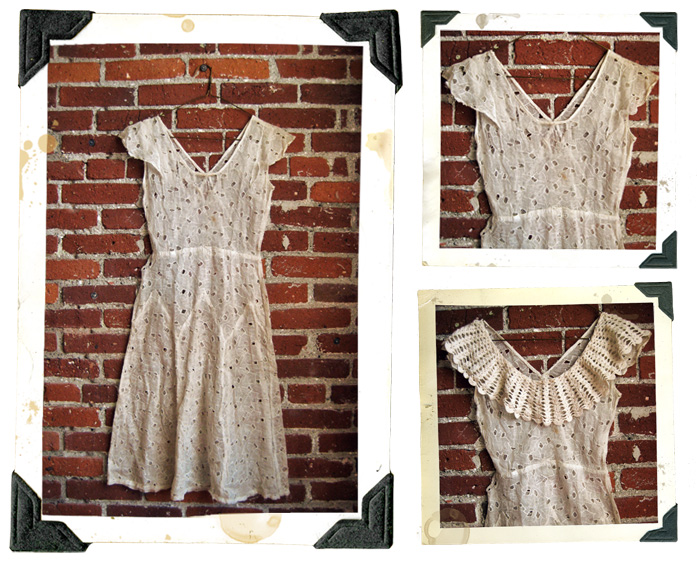
Here's the before picture. Please excuse my pixelated face. My love for you guys only goes so far and it doesn't reach into Sunday-morning-haven't-showered-been-digging-through-piles-of-dirty-clothes territory. The most important thing I was looking for in the dress was a fit through the shoulders. As long as the shoulders fit, you can take it in anywhere else. On this dress, all I really want to do is take up the length to make it a mini. All you need is a measuring tape, scissors, tailor's chalk and a sewing machine (nothing fancy - I got mine at K-Mart).

The first thing you need to do is determine how long you want the skirt of the dress. I like mine to fall approximately 17 inches from my waist. That's a not-too-long/not-too-short length on me. I think mini dresses look best and are most practical when the skirt portion falls just below finger tip length when your arms are straight down by your sides. To determine how long your skirt needs to be, just hold a measuring tape up to your natural waist and let if hang down and measure where your finger tips end.

Now that you know how long the skirt needs to be, you have to determine how much to cut off the end. My skirt measures 27 inches in total length and I want my skirt to be 17 inches long so I need to make it 10 inches shorter. Wait! Before you start cutting you have to take into consideration how much of a hem you want. I like a hem of 1.5 inches so I subtract that from the 10 inches and figure out that I need to cut 8.5 inches off the bottom of the dress.

With the dress turned inside out, measure 8.5 inches up from the bottom hem, making marks with your chalk all the way around the dress. Don't skimp out and make marks only on one side - do it all the way around.

Following your chalk marks, cut the extra fabric from the bottom of the dress. Make sure you only cut through one layer of fabric at a time.

You can keep the scrap fabric for future sewing or crafting projects!

Next, with the dress still inside out, fold the hem of the dress up 1.5 inches and pin every couple of inches.

Once all your pins are in place, run a straight stitch all the way around the bottom of the dress. If you like, you can adjust this step to turn the raw edge fabric under as you sew, creating a more finished look on the inside. I do this sometimes, depending on the fabric, but since this polyester isn't going to fray, I didn't worry about it.

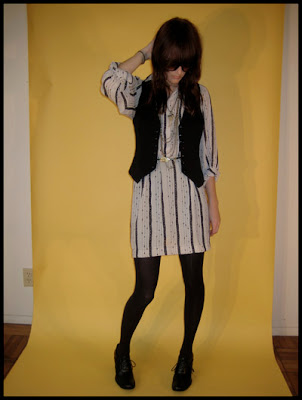
Voila! New mini dress. Accessorize with some tights and your favorite belt and vest and no one will ever know your dress started its life as a baggy, ugly cast off.

03 January 2008

Shoe Stretching


Come on, admit it. All of us are guilty of falling in love with a pair of shoes that are just a wee bit (or maybe a lot!) too small for us. Maybe it was an Ebay purchase that didn't quite work out or a thrifted pair that you couldn't pass up for only $2. Whatever the reason, we all know wearing shoes that are too small is bad for our feet. As I was purging my closet, getting ready for the big move, I ran across a pair of beloved boots, an Ebay purchase from a year or so ago. I'd almost forgotten why they had been banished into shoe purgatory. I set them aside to wear to work the next day. Needless to say, about halfway through the next day I began to remember why the boots had been banished. The right one feels about a half size smaller than the left one, pinching my toes and being all around annoying. I checked to make sure the boots are actually a matching pair and they are. And the last time I checked my feet were a matching pair as well. I am hoping to come up with a way to stretch the one boot so I don't have to part with yet another pair of too small shoes.


I know I could take them to a shoe repair shop and have them professionally stretched but I just fancy myself a little more of a DIY kind of girl. Besides, paying to have the shoes stretched kind of defeats getting them for such a good bargain. A little internet research turned up these options:

  1. "To soften leather cut a potato up and stuff it into the area that you want stretched or softened. It works, don't ask me how but it does. Leave the potato overnight and see if they're better!" How can I put this lightly. Um, NO! No potatoes in the shoes, please. Next!
  2. "Put on a heavy pair of socks, spray the inside of the shoe with 50-50 water and rubbing alcohol solution, and wear the shoes for 20 minutes- almost always works." There were a lot of these "put on wet socks" solutions out there. Sounds more like a recipe for blisters if you ask me.
  3. "Place a plastic bag in the shoe and fill the bag with water. Place the shoe in the freezer. When the ice expands the shoe will stretch as well." This sounds the most promising so far. I can see how, technically, it could work. I'm afraid that freezing might not be good for the vintage leather.
  4. "Stuff your shoe full of damp newspaper as full as you can possibly do it and leave it overnight." This sounds like a possible solution. Much better than a wet sock.
  5. "Put the shoe on with a pair of thick socks. Heat the leather for about one minute with a hair dryer to soften the leather. Walk around in the shoes until they are completely cooled off." Now this sounds more like my speed. Toasty toes and stretched shoes at the same time? Perfect.

I'll be putting (some) of these to the test and I'll be sure to let you know how it goes. Anybody out there have any other suggestions? And please, step away from the vegetables.

05 September 2007

Wednesday Morning Brunch

I found this dress at the Fairfax Flea Market my first summer in LA. It was too big for me, but I couldn't resist buying it and was able to take it in enough to fit. It's made out of bandanas and trimmed in white ric-rac. I think it might be my favorite dress (if I had to pick one) even though I haven't found that many times to wear it. Today my aunt and uncle from Bellingham, Washington are in town on a layover to South America and we're having brunch so I finally have an excuse to wear it again. A few weeks ago, I ran across the pattern for it on EBay and again, couldn't resist. I took out all the pattern pieces in an ambitious moment and then put them right back in the envelope. Wow, that's a lot of pattern pieces. I'd love to attempt it someday.

04 September 2007

Still Sewing

I knew I had sewing homework to complete over the weekend, even with the heat and lack of air conditioning making me feel completely lethargic. The bodice of the 50's dress was almost complete from my last class session. I just had to finish the darts and the sleeve cuffs and then install the sleeves. That was going to be the tricky part, as I have never put sleeves in anything before. It all went off without a hitch, thank goodness. Well, almost. I did scorch the cotton a bit in an over zealous attempt to iron the sleeve caps smooth. Ah, yes, ironing in 100 degree heat is always fun. Here are a few photos of the progress...


Here is the bodice of the dress before I put the darts in.


I pinned all the darts in place and then sewed them - six darts in all. A helpful tip I learned in class is to never back stitch at the point of a dart to finish it. Just switch to a smaller stitch length about a cm from the point and then sew right off the edge.


Last but not least I eased in the sleeves. There's a bit of a fit issue but I am making the smallest size the pattern comes in and it still seems too big for me. I'm just taking it all in as a learning exercise since the dress is not exactly my style anyway.


Here's a close up of the sleeve cap installed. This was my biggest accomplishment for the day. I feel like being able to sew sleeves opens up a whole realm of possibilities for me.

22 August 2007

Sewing Class

I'm almost convinced that something in the universe is trying to tell me to not take this sewing class. I had my new bus route all mapped out, printed, and in hand so there was no way I could screw it up this time. Well, when I got to the bus stop, this is the scene that greeted me:

I think half of West Hollywood was on fire. Of course that's the corner my new bus stop was on and there was no way a bus was getting through there. Luckily, I was able to call my boyfriend at work and he went online and found a new bus route for me. Unluckily, I wore my favorite wedges and had to sprint half way across WeHo to catch the bus. Sadly, they paid the price.

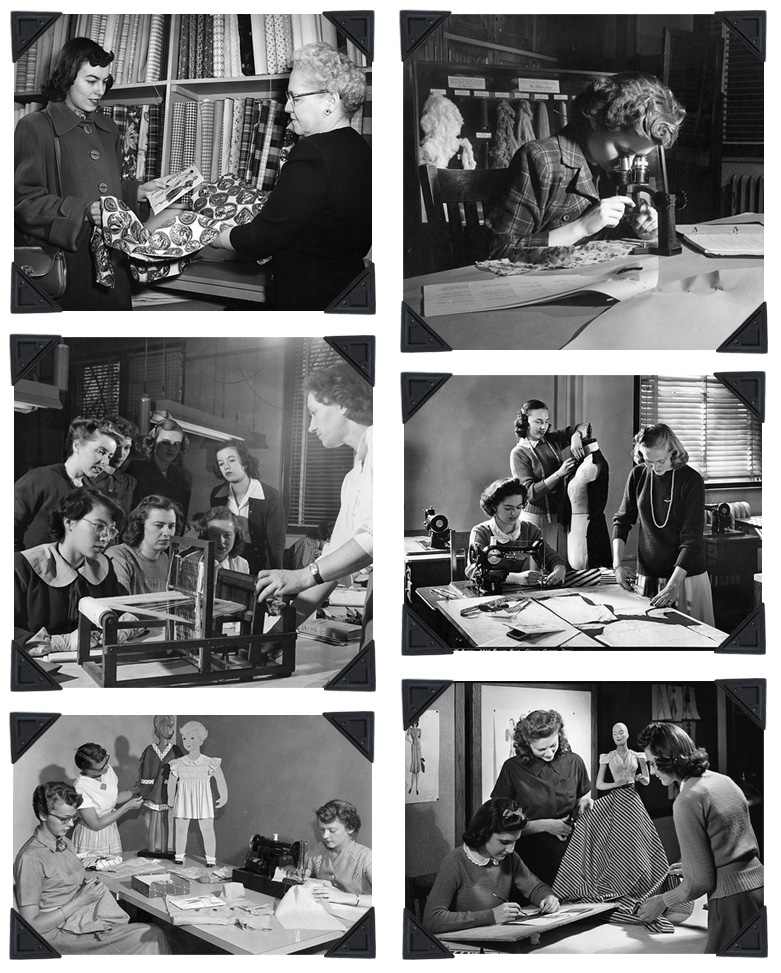
I've actually had this problem several times lately. I buy a pair of vintage shoes in pristine condition and a few months later they are falling apart. I think the rubber heels are dry rotting. Is there any thing that can be done to prevent this? Anyway, I digress. Two buses later, I made it to class right on time. Here's a shot of my future dress. I look at the pieces and I can't imagine they're going to actually be a dress. I guess we'll see!

21 August 2007

Sewing Class Project

Assuming that I actually make it to class tonight (after last week's bus debacle) I'll be starting work on a 50's inspired house dress. It buttons up the front and has a collar and either short or 3/4 length sleeves (I haven't decided which yet). I also have the option of making an a-line, gathered or pleated skirt for the bottom half of the dress. I think I'd like to learn pleats.

At the fabric store on Saturday, I was having a hard time deciding on a fabric. Budget is definitely a factor, as they have many beautiful fabrics that cost $40 a yard. Not exactly learning materials.

I finally decided on this robin's egg blue cotton with a brown and white floral design. The silhouette of the dress is very 50's house wife and I thought the color palette here would suit that nicely. Also, the flower pattern on the fabric is not directional, so I don't have to worry about keeping all the flowers going the same way when I'm sewing.


Here's the pattern that I'll be using. Not really something I would pick to sew on my own, but for class purposes it does in corporate a lot of skills I am excited to learn.


And I couldn't help but include a shot from the "Wall of Fame" at the fabric store. Yes, that is Britney Spears and Rob Schneider.

20 August 2007

The Making of a Dress

This weekend I decided to tackle my first sewing project outside of class. I went with a pretty simple vintage dress pattern and picked out some inexpensive vintage fabric so I wouldn't be out big bucks if things went terribly wrong. Well, I managed to finish the dress yesterday afternoon, but not without a few set backs. Let's just say the seam ripper and I became very good friends. It's not perfect by any stretch of the imagination but I'm chalking it up to a learning experience and I'll definitely be able to make some improvements the next time I tackle that pattern.


So many to choose from!

My final selections from the store all ready to go.


Hard at work on the gathers for the neckline. For some reason attaching the neckband gave me fits. I sewed it on three different times!


Still sewing. There were points that I felt like scrapping the whole thing and starting over.


Here's a shot of the finished piece. I was happy to finish it, but it's not with out its flaws (if you can't see them in the photo, I'm certainly not going to point them out!) It'll be fun to wear it around the house. Maybe the next one I make, I'll actually wear out in public!

16 August 2007

Vintage Fabrics


Anyone interested in sewing or crafting with vintage fabrics should check out the Repro Depot. They have tons of great vintage cottons for garment sewing and heavier fabrics for decorating and crafts. They also have loads of cute notions. I'm partial to the sci-fi buttons myself. I mean, who doesn't want space men and ray guns decorating their clothes?